How to Get the “Size” of a std::vector?

First, let’s reveal the mystery of the “fixed 24-byte sizeof”; then, let’s see how to properly get the total size, in bytes, of all the elements stored in a std::vector.

Someone was modernizing some legacy C++ code. They had an array defined like this:

int v[100];

and they needed the size, in bytes, of that array, to pass that value to some function. They used sizeof(v) to get the previous array size.

When modernizing their code, they chose to use std::vector instead of the above raw C-style array. And they still used sizeof(v) to retrieve the size of the vector. For example:

// Create a vector storing 100 integers
std::vector<int> v(100);

std::cout << sizeof(v);

The output they got when building their code in release mode with Visual Studio 2019 was 24. They also noted that they always got the same 24 output, independently from the number of elements in the std::vector!

This is clearly a bug. Let’s try to shed some light on it and show the proper way of getting the size of the total number of elements stored in a std::vector.

First, to understand this bug, you need to know how a std::vector is implemented. Basically, at least in Microsoft STL implementation (in release builds, and when using the default allocator1), a std::vector is made by three pointers, kind of like this:

template <typename T>
class vector
{
    T* first;
    T* last;
    T* end;

    ...
};

Diagram showing a typical implementation of std::vector, made by three pointers: first, last and end. The valid elements are those pointed between first (inclusive) and last (exclusive).
Typical implementation of std::vector with three pointers: first, last, end
  1. first: points to the beginning of the contiguous memory block that stores the vector’s elements
  2. last: points one past the last valid element stored in the vector
  3. end: points one past the end of the allocated memory for the vector’s elements

Spelunking inside the Microsoft STL implementation, you’ll see that the “real” names for these pointers are _Myfirst, _Mylast, _Myend, as shown for example in this part of the <vector> header:
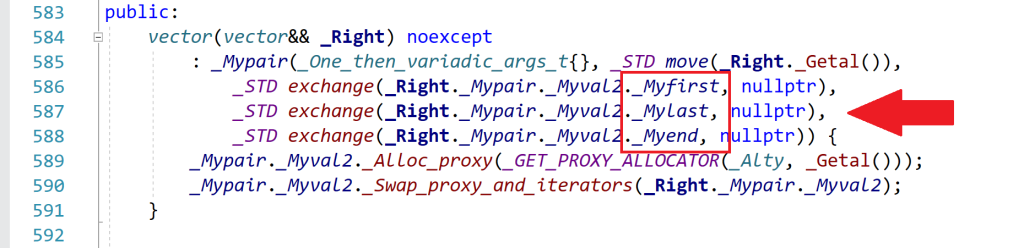
Part of the vector header that shows the identifiers that represent the vector's three internal pointers: first, last and end.
An excerpt of the <vector> header that comes with Microsoft Visual Studio 2019

So, when you use sizeof with a std::vector instance, you are actually getting the size of the internal representation of the vector. In this case, you have three pointers. In 64-bit builds, each pointer occupies 8 bytes, so you have a total of 3*8 = 24 bytes, which is the number that sizeof returned in the above example.

As you can see, this number is independent from the actual number of elements stored in the vector. Whether the vector has one, three, ten or 10,000 elements, the size of the vector’s internal representation made by those three pointers is always fixed and given by the above number (at least in the Microsoft’s STL implementation that comes with Visual Studio2).

Now that the bug has been analyzed and the mystery explained, let’s see how to fix it.

Well, to get the “size of a vector”, considered as the number of bytes occupied by the elements stored in the vector, you can get the number of elements stored in the vector (returned by the vector::size method), and multiply that by the (fixed) size of each element, e.g.:

//
// v is a std::vector<int>
//
// v.size()    : number of elements in the vector
// sizeof(int) : size, in bytes, of each element
//
size_t sizeOfAllVectorElementsInBytes = v.size() * sizeof(int);

To write more generic code, assuming the vector is not empty, you can replace sizeof(int) with sizeof(v[0]), which is the sizeof the first element stored in the vector. (If the vector is empty, there is no valid element stored in it, so the index zero in v[0] is out of bounds, and the above code won’t work; it will probably trigger an assertion failure in debug builds.)

In addition, you could use the vector::value_type type name member to get the size of a single element (which would work also in the case of empty vectors). For example:

using IntVector = std::vector<int>;

IntVector v(100);

// Print the number of bytes occupied 
// by the (valid) elements stored in the vector:
cout << v.size() * sizeof(IntVector::value_type);

To be even more generic, a helper template function like this could be used:

//
// Return the size, in bytes, of all the valid elements
// stored in the input vector
//
template <typename T, typename Alloc>
inline size_t SizeOfVector(const std::vector<T, Alloc> & v)
{
    return v.size() * sizeof(std::vector<T, Alloc>::value_type);
}


//
// Sample usage:
//
std::vector<int> v(100);
std::cout << SizeOfVector(v) << '\n'; 
// Prints 400, i.e. 100 * sizeof(int)

Bonus Reading

If you want to learn more about the internal implementation of std::vector (including how they represent the default allocator with an “empty class” using the compressed pair trick), you can read these two interesting blog posts on The Old New Thing blog:

  1. Inside the STL: The pair and the compressed pair
  2. Inside the STL: The vector

  1. In debug builds, or when using a custom allocator, there can be more stuff added to the above simple std::vector representation. ↩︎
  2. Of course, that number can change in debug builds, or when using custom allocators, as per the previous note. ↩︎

How to Load CString from Resources

Very easy! It’s just a matter of invoking a constructor with a type cast.

Last time we saw how to load a string resource into a wstring. As already explained, ATL/MFC’s CString does offer very convenient methods for Win32 C++ programming. So, how can you load a string resource into a CString instance?

Well, it’s very simple! Just pass the string ID to a CString constructor overload with a proper type cast:

// Load string with ID IDS_MY_STRING from resources 
// into a CString instance
CString myString( (PCTSTR) IDS_MY_STRING );

You can even #define a simple preprocessor macro that takes the string resource ID and and creates a CString object storing the string resource:

#define _S(stringResId) (CString((PCTSTR) (stringResId)))

When you need to pass a (localized) string loaded from resources to a Win32 API or ATL/MFC class member function that expects a string pointer (typically in the form of LPCTSTR/PCTSTR, i.e. const TCHAR*), then you can simply use the convenient macro defined above:

// Show a message-box to the user, 
// displaying strings loaded from resources
MessageBox(nullptr,
           _S(IDS_SOME_MESSAGE_FOR_THE_USER),
           _S(IDS_SOME_TITLE),
           MB_OK);

How does that work?

Well, first the _S macro defined above creates a (temporary) CString object and loads the string resource into it. Then, the implicit LPCTSTR conversion operator provided by CString is invoked by the C++ compiler, so the (read-only) string pointer is passed to the proper parameter of the MessageBox API.

See how simple is that compared to using std::wstring, where we needed to create an ad hoc non-trivial function to load wstring from resources!

How to Load std::wstring from Resources

CString easily allows loading strings from resources “out of the box”. Let’s try to implement this feature for std::wstring.

As discussed in the previous blog post, CString offers convenient methods for Windows C++ programming, including those to load strings from resources.

What Is a String Resource and Why Should You Care?

Basically, in a Windows Win32 C++ application you can store your strings (like messages for the user) as resources, and then reference them in your C++ code via their IDs. If you want to localize your application for a different language, a translator can take the string resources and translate them into the destination language. The C++ source code remains the same, as it references strings not by their language-specific literal form (e.g. “Cannot access the Registry key XYZ”), but using language-neutral resource IDs (e.g. IDS_CANNOT_ACCESS_REGISTRY_KEY_XYZ).

Accessing String Resources via the LoadString(W) API

To access a Unicode (UTF-16) string resource, you can use the LoadStringW Win32 API.

The Microsoft documentation for the LoadStringW API reads:

Loads a string resource from the executable file associated with a specified module and either copies the string into a buffer with a terminating null character or returns a read-only pointer to the string resource itself.

From that paragraph, we get that there are two different behaviors available for this API:

  1. Copy the string resource into a user-provided buffer.
  2. Return a read-only pointer to the string resource itself.

Behavior #1: Copying the String Resource into a User-provided Buffer

The first behavior is shown several times in Microsoft documentation. For example, the doc page about LoadStringW refers to the following sample code:

Sample code for LoadString, referenced by the official Microsoft documentation of that API.
Example code for LoadString referenced by the official Microsoft documentation

Basically, the idea here is to create a TCHAR buffer, and invoke LoadString to load the string resource into that buffer:

TCHAR sz[160];
LoadString(hInst, IDS_UNTITLED, sz, sizeof(sz)/sizeof(TCHAR));

In Unicode builds, TCHAR becomes WCHAR (i.e. wchar_t), and LoadString becomes LoadStringW.

One of the problem of this kind of code is that the buffer is pre-allocated with a given fixed size. Then, what happens if the string read from resources is larger than the pre-allocated buffer? The string is silently truncated, as per the official MS documentation about the cchBufferMax parameter:

The string is truncated and null-terminated if it is longer than the number of characters specified.

This could make the UI ugly if it is just a user message string that gets truncated; or it can become a much more serious bug if the truncated string is something like the format specifier for some printf-like function.

Moreover, in that code there is no check on the return value of LoadString. So, if the function fails, the buffer could contain garbage, and that could cause other bugs. (Although, I understand that often MS documentation doesn’t include error checking; but it’s important to point that out, as often people copy-paste code from MS doc samples, and silent bugs are introduced in their own code.)

In addition, it’s important to remember to properly scale the “sizeof” the destination buffer, dividing it by sizeof(TCHAR), which is sizeof(WCHAR) == 2 (bytes) in Unicode builds. Failing to do so would cause additional buffer overflow problems.

You can use a std::wstring of proper size, and pass a pointer to the internal string characters instead of using a raw wchar_t array, but the aforementioned problems still remain.

Behavior #2: Getting a Read-only Pointer to the String Resource

To me the behavior #2 (which is: get a read-only pointer to the string resource itself) is what leads to better and easier code (despite some type cast). However, it’s not very clear from the current MS documentation how to operate the LoadStringW API in this “behavior #2” mode.

So, let’s explain that here. Let’s start with the function declaration:

int LoadStringW(
  [in, optional] HINSTANCE hInstance,
  [in]           UINT      uID,
  [out]          LPWSTR    lpBuffer,
  [in]           int       cchBufferMax
);

To enable behavior #2 (i.e. return a read-only pointer to the string resource itself), you need to pass 0 (zero) for the last parameter cchBufferMax.

If you pass zero for cchBufferMax, the LoadStringW API says: “Hey, the caller wants me to just return a read-only pointer to the string resource itself, with no deep-copies in a user-provided buffer. Ok, let’s do that!”

Where does the API get the information about the destination string pointer? In other words: Where can the LoadStringW API write the string resource’s address? Well, it uses the third parameter for that: lpBuffer.

However, there’s a gotcha here (that I think is not well documented in the official MS web page). Basically, you need to create a const wchar_t pointer that will store the address of the resource string (which is read-only, hence the const):

// Pointer to the start of the string resource
const wchar_t* pchStringBegin = nullptr;

Then you need to pass the address of this pointer as the lpBuffer parameter to LoadStringW: &pchStringBegin. Note that, in this way, you are using a double-indirection, i.e. a pointer-to-a-pointer. Since the lpBuffer parameter is declared as LPWSTR (i.e. wchar_t*), you have a type mismatch for this parameter. In fact, LoadStringW expects a simple wchar_t* pointer; but you are passing a pointer-to-a-wchar_t-pointer (double indirection). However, this type mismatch is needed and expected by the behavior #2, so in this case you can safely use reinterpret_cast to make the C++ compiler happy about that type mismatch.

So, the LoadStringW call can look like this:

// Invoke LoadStringW, requesting a pointer 
// to the beginning of the string resource
int cchStringLength = ::LoadStringW(
        hInstance, 
        resourceId, 
        reinterpret_cast<PWSTR>(&pchStringBegin), 
        0);

Note that the string resource is not necessarily NUL-terminated! But, thankfully, on success, the LoadStringW API returns the number of characters (as count of wchar_ts) in the string resource.

So, you can use these two pieces of information to build a std::wstring instance to safely store the string resource:

  1. The pointer to the start of the string resource
  2. The number of wchar_ts in the string resource

In code, this becomes:

if (cchStringLength > 0) // LoadStringW succeeded
{
    // Create a std::wstring storing the string loaded from resources
    return std::wstring(pchStringBegin, cchStringLength);
}

On failure, LoadStringW returns zero. Then you can choose if you want to throw an exception, log an error message, return an empty string to the user, return a std::optional<std::wstring>, or whatever.

Wrapping Up: An Easy-to-Use and Hard-to-Misuse Helper Function for Loading String Resources into std::wstring

To wrap up this blog post, this is a nice LoadStringFromResources reusable C++ function that you can invoke to load string resources into std::wstring:

//
// Load a string resource into a std::wstring
//
[[nodiscard]] std::wstring LoadStringFromResources(
    _In_opt_ HINSTANCE hInstance, 
    _In_     UINT resourceId
)
{
	// Pointer to the first character of the string.
	// NOTE: *Not* necessarily null-terminated!!
	const wchar_t* pchStringBegin = nullptr;

	// Invoke LoadStringW, requesting a pointer 
    // to the beginning of the string resource itself
	const int cchStringLength = ::LoadStringW(
            hInstance, 
            resourceId, 
            reinterpret_cast<PWSTR>(&pchStringBegin),
            0);

	ATLASSERT(cchStringLength >= 0);
	if (cchStringLength > 0)
	{
        // Success
		return std::wstring(pchStringBegin, cchStringLength);
	}
	else
	{
        // Failure: Throw an exception
		// const DWORD error = ::GetLastError();
		AtlThrowLastWin32();
	}
}

CString or std::string? That Is The Question (2023 Revisited)

Revisiting one of my first blog posts from 2010. Should you pick CString or std::string? Based on what context (ATL, MFC, cross-platform code)? And why?

…with (more) apologies to Shakespeare 🙂

I discussed that in 2010 at the beginning of my blog journey (on the now defunct MSMVPs blog web site – Thank You Very Much Internet Archive!).

It’s interesting to revisit that post today toward the end of 2023, more than 10 years later.

So, should we use CString or std::string class to store and manage strings in our C++ code?

Well, if there is a need of writing portable C++ code, the choice should be std::string, which is part of the C++ standard library.

(Me, on January 4th, 2010)

Still true today. Let’s also add that we can use std::string with Unicode UTF-8-encoded text to represent international text.

But, in the context of C++ Win32 programming (using ATL or MFC), I find CString class much more convenient than std::string.

These are some reasons:

Again, I think that is still true today. Now let’s see the reasons why:

1) CString allows loading strings from resources, which is good also for internationalization.

Still valid today. (You have to write additional code to do that with STL strings.)

2) CString offers a convenient FormatMessage method (which is good for internationalization, too; see for example the interesting problem of “Yoda speak” […])

Again, still true today. Although in C++20 (20+ years later than MFC!1) they added std::format. There’s also something from Boost (the Boost.Format library).

3) CString integrates well with Windows APIs (the implicit LPCTSTR operator comes in handy when passing instances of CString to Windows APIs, like e.g. SetWindowText).

Still valid today.

4) CString is reference counted, so moving instances of CString around is cheap.

Well, as discussed in a previous blog post, the Microsoft Visual C++ compiler and C++ Standard Library implementation have been improved a lot since VS 2008, and now the performance of STL’s strings is better than CString, at least for adding many strings to a vector and sorting the string vector.

5) CString offers convenient methods to e.g. tokenize strings, to trim them, etc.

This is still a valid reason today. 20+ years later, with C++20 they finally added some convenient methods to std::string, like starts_with and ends_with, but this is very little and honestly very late (but, yes, better late than ever).

So, CString is still a great string option for Windows C++ code that uses ATL and/or MFC. It’s also worth noting that you can still use CString at the ATL/MFC/Win32 boundary, and then convert to std::wstring or std::string for some more complex data structures (for example, something that would benefit from move semantics), or for better integration with STL algorithms or Boost libraries, or for cross-platform portions of C++ code.

  1. I used and loved Visual C++ 6 (which was released in 1998), and its MFC implementation already offered a great CString class with many convenient methods including those discussed here. So, the time difference between that and C++20 is more than 20 years! ↩︎

C++ String Benchmark: STL vs. ATL vs. Custom Pool Allocator

Let’s see how STL strings, ATL CString and strings coming from a custom pool allocator perform in a couple of interesting contexts (string vector creation and sorting).

As you probably already know, there are quite a few different kinds of strings available in C++. I was curious to compare the performance of Microsoft Visual Studio C++ STL string implementation versus ATL CString versus a custom string pool allocator.

Basically, the pool allocator maintains a singly-linked list of chunks, and string memory is carved from each chunk just increasing a string pointer. When there isn’t enough memory available in the current chunk to serve the requested allocation, a new chunk is allocated. The new chunk is safely linked to the previous chunk list maintained by the allocator object, and the memory for the requested string is carved from this new chunk. At destruction time, the linked list of chunks is traversed to properly release all the allocated memory blocks.

Schema of a custom memory pool allocator.
Custom pool allocator

You can find the complete compilable C++ implementation code on GitHub.

I measured the execution times to create and fill string vectors, and the execution times to sort the same vectors.

TL;DR: The STL string performance is great! However, you can improve creation times with a custom pool allocator.

The execution times are measured for vectors storing each kind of strings: STL’s wstring, ATL’s CString (i.e. CStringW in Unicode builds), and the strings created using the custom string pool allocator.

This is a sample run (executed on a Windows 10 64-bit Intel i7 PC, with code compiled with Visual Studio 2019 in 64-bit release build):

Benchmark results: STL performs better than ATL for creation/filling the string vector, but the custom string pool allocator offers the best performance. For sorting, STL and the pool allocator show basically the same performance.
String benchmark: STL vs. ATL’s CString vs. custom string pool allocator

As you can note, the best creation times are obtained with the custom string pool allocator (see the POL1, POL2 and POL3 times in the “Creation” section).

For example:

String typeRun time (ms)
ATL CStringW954
STL std::wstring866
Pool-allocated strings506
Sample execution times for creating and filling string vectors

In the above sample run, the pool-allocated strings are about 47% faster than ATL’s CString, and about 42% faster than STL’s wstring.

This was expected, as the allocation strategy of carving string memory from pre-allocated blocks is very efficient.

Regarding the sorting times, STL and the custom pool strings perform very similarly.

On the other hand, ATL’s CString shows the worst execution times for both creation and sorting. Probably this is caused by CString implementation lacking optimizations like move semantics, and using _InterlockedIncrement/_InterlockedDecrement to atomically update the reference count used in their CoW (Copy on Write) implementation. Moreover, managing the shared control block for CString instances could cause an additional overhead, too.

Historical Note: I recall that I performed a similar benchmark some years ago with Visual Studio 2008, and in that case the performance of ATL’s CString was much better than std::wstring. I think move semantics introduced with C++11 and initially implemented in VS2010 and then refined in the following versions of the C++ compiler, and more “programming love” given to the MSVC’s STL implementation, have shown their results here in the much improved STL string performance.

Benchmark Variation: Tiny Strings (and SSO)

It’s also possible to run the benchmark with short strings, triggering the SSO (to enable this, compile the benchmark code #define’ing TEST_TINY_STRINGS).

Here’s a sample run:

The same benchmark executed with tiny strings. In this case, STL strings show a significant speed increase thanks to the SSO (Small String Optimization).
String benchmark with tiny strings: STL vs. ATL vs. custom string pool allocator

As you can see in this case, thanks to the SSO, STL strings win by an important margin in both creation and sorting times.

How to Prevent Integer Overflows in C++?

A simple solution that works fine in many situations.

Let’s consider the Sum function shown a few posts ago that exhibited bogus results due to signed integer overflow:

// Sum the 16-bit signed integers stored in the values vector
int16_t Sum(const std::vector<int16_t>& values)
{
    int16_t sum = 0;
 
    for (auto num : values)
    {
        sum += num;
    }
 
    return sum;
}

How can you fix the integer overflow problem and associated weird negative results discussed in the above blog post?

Well, one option would be to simply “step up” the integer type. In other words, instead of storing the sum into an int16_t variable, you could use a larger integer type, like int32_t or even int64_t. I mean, the maximum positive integer value that can be represented with a 64-bit (signed) integer is (2^63)-1 = 9,223,372,036,854,775,807: sounds pretty reasonable to represent the sum of some 16-bit samples, doesn’t it?

The updated code using int64_t for the cumulative sum can look like this:

// Sum the 16-bit signed integers stored in the values vector.
// The cumulative sum is stored in a 64-bit integer 
// to prevent integer overflow.
int64_t Sum(const std::vector<int16_t>& values)
{
    int64_t sum = 0;

    for (auto num : values)
    {
        sum += num;
    }

    return sum;
}

Considering the calling code of the initial blog post:

std::vector<int16_t> v{ 10, 1000, 2000, 32000 };
std::cout << Sum(v) << '\n';

this time with the int64_t fix you get the correct result of 35,010. Of course, also a simple shorter int32_t would have worked fine in this example. And, if you want to be super-safe, you can still wrap it in a convenient SafeInt<>.

C++ Mystery Revealed: Why Do I Get a Negative Integer When Adding Two Positive Integers?

Explaining some of the “magic” behind signed integer overflow weird results.

In this blog post, I showed you some “interesting” (apparently weird) results that you can get when adding signed integer numbers. In that example, you saw that, if you add two positive signed integer numbers and their sum overflows (signed integer overflow is undefined behavior in C++), you can get a negative number.

As another example, I compiled this simple C++ code with Visual Studio C++ compiler:

#include <cstdint>  // for int16_t
#include <iostream> // for std::cout

int main()
{
    using std::cout;

    int16_t a = 3000;
    int16_t b = 32000;
    int16_t c = a + b;  // -30536

    cout << " a = " << a << '\n';
    cout << " b = " << b << '\n';
    cout << " a + b = " << c << '\n';
}

and got this output, with a negative sum of -30536.

Two positive integers are added, and a negative sum is returned due to signed integer overflow.
Signed integer overflow causing a negative sum when adding positive integers

Now, you may ask: Why is that?

Well, to try to answer this question, consider the binary representations of the integer numbers from the above code:

int16_t a = 3000;  // 0000 1011 1011 1000
int16_t b = 32000; // 0111 1101 0000 0000
int16_t c = a + b; // 1000 1000 1011 1000

If you add a and b bitwise, you’ll get the binary sequence shown above for c.

Now, if you interpret the c sum’s binary sequence as a signed integer number in the Two’s complement representation, you’ll immediately see that you have a negative number! In fact, the most significant bit is set to 1, which in Two’s complement representation means that the number is negative.

int16_t c = a + b; 
    //  c: 1000 1000 1011 1000
    //     1xxx xxxx xxxx xxxx
    //     *
    //     ^--- Negative number
    //          Most significant bit = 1

In particular, if you interpret the sum’s binary sequence 1000 1000 1011 1000 in Two’s complement, you’ll get exactly the negative value of -30536 shown in the above screenshot.

How to Make SafeInt Compatible with Windows Platform SDK Headers

Invasive preprocessor macro definitions strike again.

Last time, I introduced the convenient and easy-to-use SafeInt C++ library.

You might have experimented with it in a simple C++ console application, and noted that everything is fine.

Now, suppose that you want to use SafeInt in some Windows C++ project that directly or indirectly requires the <Windows.h> header.

Well, if you take your previous C++ code that used SafeInt and successfully compiled, and add an #include <Windows.h>, then try to compile it again, you’ll get lots of error messages!

Typically, you would get lots of errors like this:

Error C2589 ‘(‘: illegal token on right side of ‘::’

Error list in Visual Studio, when trying to compile C++ code that uses SafeInt and includes Windows.h.
Error list in Visual Studio, when trying to compile C++ code that uses SafeInt and includes <Windows.h>

If you try and click on one of these errors, Visual Studio will point to the offending line in the “SafeInt.hpp” header, as shown below.

An example of offending line in SafeInt.hpp.
An example of offending line in SafeInt.hpp

In the above example, the error points to this line of code:

if (t != std::numeric_limits<T>::min() )

So, what’s going on here?

Well, the problem is that the Windows Platform SDK defines a couple of preprocessor macros named min and max. These definitions were imported with the inclusion of <Windows.h>.

So, here the C++ compiler is in “crisis mode”, as the above Windows-specific preprocessor macro definitions conflict with the std::numeric_limits::min and max member function calls.

So, how can you fix that?

Well, one option could be to #define the NOMINMAX preprocessor macro before including <Windows.h>:

#define NOMINMAX
#include <Windows.h>

In this way, when <Windows.h> is included, some preprocessor conditional compilation will detect that NOMINMAX is defined, and will skip the definitions of the min and max preprocessor macros. So, the SafeInt code will compile fine.

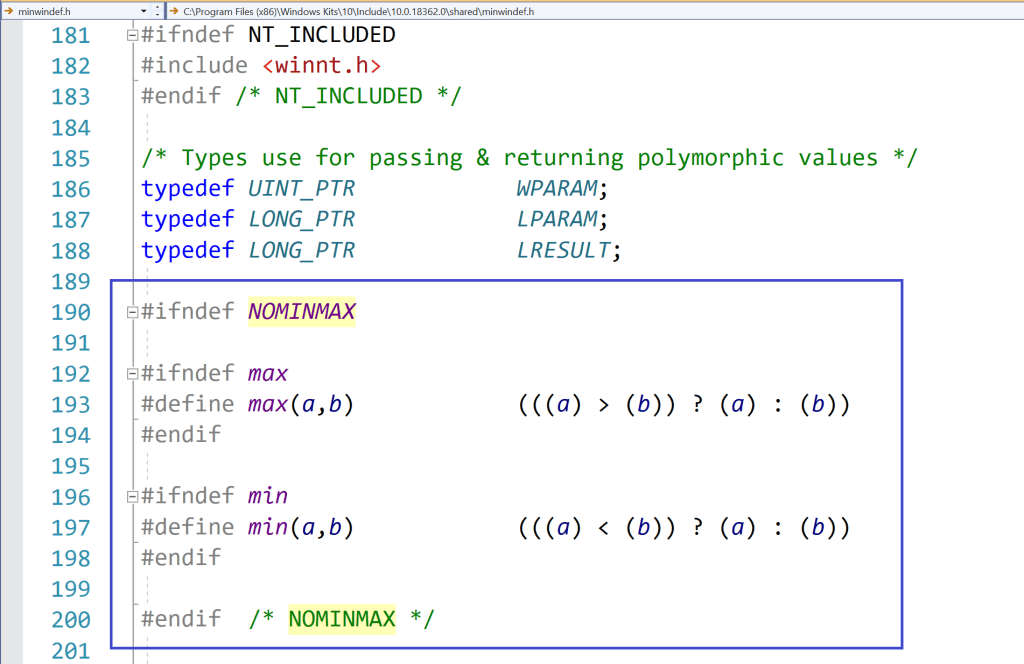
Preprocessor logic in a Windows SDK header (minwindef.h) for the conditional compilation of the min and max macros.
Preprocessor logic in a Windows SDK header (<minwindef.h>) for the conditional compilation of the min and max macros

So, everything’s fine now, right?

Well, unfortunately not! In fact, if you may happen to include (directly or indirectly) the GDI+ header <gdiplus.h>, you’ll see that you’ll get compilation errors again, this time because some code in GDI+ does require the above Windows definitions of the min and max macros!

So, the previous (pseudo-)fix of #defining NOMINMAX, caused another problem!

Well, if you are working on your own C++ code, you can make your code immune to the above Windows min/max preprocessor macro problem, using an extra pair of parentheses around the std::numeric_limits<T>::min and max member function calls. This additional pair of parentheses will prevent the expansion of the min and max macros.

// Prevent macro expansion with an additional pair of parentheses
// around the std::numeric_limit's min and max member function calls.
(std::numeric_limits<T>::min)()
(std::numeric_limits<T>::max)()

However, that is not the case for the code in SafeInt.hpp. To try to make SafeInt.hpp more compatible with C++ code that requires the Windows Platform SDK, I modified the library’s code with the extra pairs of parentheses (added in many places!), and submitted a pull request. I hope the SafeInt library will be fixed ASAP.

Protecting Your C++ Code Against Integer Overflow Made Easy by SafeInt

Let’s discuss a cool open-source C++ library that helps you write nice and clear C++ code, but with safety checks *automatically* added under the hood.

In previous blog posts I discussed the problem of integer overflow and some subtle bugs that can be caused by that (we saw both the signed and the unsigned integer cases).

Now, consider the apparently innocent simple C++ code that sums the integer values stored in a vector:

// Sum the 16-bit signed integers stored in the values vector
int16_t Sum(const std::vector<int16_t>& values)
{
    int16_t sum = 0;
 
    for (auto num : values)
    {
        sum += num;
    }
 
    return sum;
}

As we saw, that code is subject to bogus integer overflow, and may return a negative number even if all positive integer numbers are added together!

To prevent that kind of bugs, we added a safety check before doing the cumulative sum, throwing an exception in case an integer overflow was detected. Better throwing an exception than returning a bogus result!

The checking code was:

//
// Check for integer overflow *before* doing the sum
//
if (num > 0 && sum > std::numeric_limits<int16_t>::max() - num)
{
    throw std::overflow_error("Overflow in Sum function when adding a positive number.");
}
else if (num < 0 && sum < std::numeric_limits<int16_t>::min() - num)
{
    throw std::overflow_error("Overflow in Sum function when adding a negative number.");
}

// The sum is safe
sum += num;

Of course, writing this kind of complicated check code each time there is a sum operation that could potentially overflow would be excruciatingly cumbersome, and bug prone!

It would be certainly better to write a function that performs this kind of checks, and invoke it before adding two integers. That would be certainly a huge step forward versus repeating the above code each time two integers are added.

But, in C++ we can do even better than that!

In fact, C++ offers the ability to overload operators, such as + and +=. So, we could write a kind of SafeInt class, that wraps a “raw” built-in integer type in safe boundaries, and that overloads various operators like +,+=, and so on, and transparently and automatically checks that the operations are safe, and throws an exception in case of integer overflow, instead of returning a bogus result.

This class could be actually a class template, like a SafeInt<T>, where T could be an integer type, like int, int16_t, uint16_t, and so on.

That is a great idea! But developing that code from scratch would certainly require lots of time and energy, and especially we would spend a lot of time debugging and refining it, considering various corner cases and paying attention to the various overflow conditions, and so on.

Fortunately, you don’t have to do all that work! In fact, there is an open source library that does exactly that! This library is called SafeInt. It was initially created in Microsoft Office in 2003, and is now available as open source on GitHub.

To use the SafeInt C++ library in your code, you just have to #include the SafeInt.hpp header file. Basically, the SafeInt class template behaves like a drop-in replacement for built-in integer types; it does however do all the proper integer overflow checks behind the hood of its overloaded operators.

So, considering our previous Sum function, we can make it safe simply replacing the “raw” int16_t type that holds the sum with a SafeInt<int16_t>:

#include "SafeInt.hpp"    // The SafeInt C++ library

// Sum the 16-bit integers stored in the values vector
int16_t Sum(const std::vector<int16_t>& values)
{
    // Use SafeInt to check against integer overflow
    SafeInt<int16_t> sum; // = 0; <-- automatically init to 0

    for (auto num : values)
    {
        sum += num; // <-- *automatically* checked against integer overflow!!
    }

    return sum;
}

Note how the code is basically the same clear and simple code we initially wrote! But, this time, the cumulative sum operation “sum += num” is automatically checked against integer overflow by the SafeInt’s implementation of the overloaded operator +=. The great thing is that all the checks are done automatically and under the hood by the SafeInt’s overloaded operators! You don’t have to spend time and energy writing potential bug-prone check code. It’s all done automatically and transparently. And the code looks very clear and simple, without additional “pollution” of if-else checks and throwing exceptions. This kind of (necessary) complexity is well embedded and hidden under the SafeInt’s implementation.

SafeInt by default signals errors, like integer overflow, throwing an exception of type SafeIntException, with the m_code data member set to a SafeIntError enum value that indicates the reason for the exception, like SafeIntArithmeticOverflow in case of integer overflow. The following code shows how you can capture the exception thrown by SafeInt in the above Sum function:

std::vector<int16_t> v{ 10, 1000, 2000, 0, 32000 };

try
{
    cout << Sum(v) << '\n';
}
catch (const SafeIntException& ex)
{
    if (ex.m_code == SafeIntArithmeticOverflow)
    {
        cout << "SafeInt integer overflow exception correctly caught!\n";
    }
}

Note that also other kinds of errors are checked by SafeInt, like attempts to divide by zero.

Moreover, the default SafeInt exception handler can be customized, for example to throw another exception class, like std::runtime_error, or a custom exception, instead of the default SafeIntException.

So, thanks to SafeInt it’s really easy to protect your C++ code against integer overflow (and divisions by zero) and associated subtle bugs! Just replace “raw” built-in integer types with the corresponding SafeInt<T> wrapper, and you are good to go! The code will still look nice and simple, but safety checks will happen automatically under the hood. Thank you very much SafeInt and C++ operator overloading!

Protecting Your C++ Code Against Unsigned Integer “Overflow”

Let’s explore what happens in C++ when you try to add *unsigned* integer numbers and the sum exceeds the maximum value. You’ll also see how to protect your unsigned integer sums against subtle bugs!

Last time, we discussed signed integer overflow in C++, and some associated subtle bugs, like summing a sequence of positive integer numbers, and getting a negative number as a result.

Now, let’s focus our attention on unsigned integer numbers.

As we did in the previous blog post, let’s start with an apparently simple and bug-free function, that takes a vector storing a sequence of numbers, and computes their sum. This time the numbers stored in the vector are unsigned integers of type uint16_t (i.e. 16-bit unsigned int):

#include <cstdint>  // for uint16_t
#include <vector>   // for std::vector

// Sum the 16-bit unsigned integers stored in the values vector
uint16_t Sum(const std::vector<uint16_t>& values)
{
    uint16_t sum = 0;

    for (auto num : values)
    {
        sum += num;
    }

    return sum;
}

Now, try calling the above function on the following test vector, and print out the result:

std::vector<uint16_t> v{ 10, 1000, 2000, 32000, 40000 };
std::cout << Sum(v) << '\n';

On my beloved Visual Studio 2019 C++ compiler targeting Windows 64-bit, I get the following result: 9474. Well, this time at least we got a positive number 😉 Seriously, what’s wrong with that result?

Well, if you see the sequence of the input values stored in the vector, you’ll note that the result sum is too small! For example, the vector contains the values 32000 and 40000, which are only by themselves greater than the resulting sum of 9474! I mean: this is (apparently…) nonsense. This is indeed a (subtle) bug!

Now, if you compute the sum of the above input numbers, the correct result is 75010. Unfortunately, this value is larger than the maximum (positive) integer number that can be represented with 16 bits, which is 65535.

Side Note: How can you get the maximum integer number that can be represented with the uint16_t type in C++? Simple: You can just invoke std::numeric_limits<uint16_t>::max():

cout << "Maximum value representable with uint16_t: \n";
cout << std::numeric_limits<uint16_t>::max() << '\n';

End of Side Note

So, here you basically have an integer “overflow” problem. In fact, the sum of the input uint16_t values is too big to be represented with an uint16_t.

Before moving forward, I’d like to point out that, while in C++ signed integer overflow is undefined behavior (so, basically the result you get depends on the particular C++ compiler/toolchain/architecture/even compiler switches, like GCC’s -fwrapv), unsigned integer “overflow” is well defined. Basically, what happens in the case of two unsigned integers being added together and exceeding the maximum value is the so called “wrap around“, according to the modulo operation.

To understand that with a concrete example, think of a clock. For example, if you think of the hour hand of a clock, when the hour hand points to 12, and you add 1 hour, the clock’s hour hand will point to 1; there is no “13”. Similarly, if the hour hand points to 12, and you add 3 hours, you don’t get 15, but 3. And so on. So, what happens for the clock is a wrap around after the maximum value of 12:

12 “+” 1 = 1

12 “+” 2 = 2

12 “+” 3 = 3

I enclosed the plus signs above in double quotes, because this is not a sum operation as we normally intend. It’s a “special” sum that wraps the result around the maximum hour value of 12.

You would get a similar “wrap around” behavior with a mechanical-style car odometer: When you reach the maximum value of 999’999 (kilometers or miles), the next kilometer or mile brings the counter back to zero.

Adding unsigned integer values follows the same logic, except that the maximum value is not 12 or 999’999, but 65535 for uint16_t. So, in this case you have:

65535 + 1 = 0

65535 + 2 = 1

65535 + 3 = 2

and so on.

You can try this simple C++ loop code to see the above concept in action:

constexpr uint16_t kU16Max = std::numeric_limits<uint16_t>::max(); // 65535
for (uint16_t i = 1; i <= 10; i++)
{
    uint16_t sum = kU16Max + i;
    std::cout << " " << kU16Max << " + " << i << " = " << sum << '\n';
}

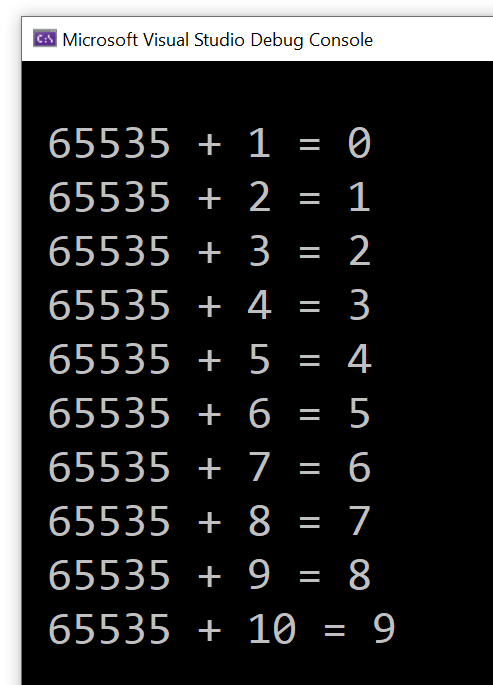
I got the following output:

Output of the above C++ loop code, showing unsigned integer wrap around in action.
Sample C++ loop showing unsigned integer wrap around

So, unsigned integer overflow in C++ results in wrap around according to modulo operation. Considering the initial example of summing vector elements: 10, 1000, 2000, 32000, 40000, the sum of the first four elements is 35010 and fits well in the uint16_t type. But when you add to that partial sum the last element 40000, you exceed the limit of 65535. At this point, wrap around happens, and you get the final result of 9474.

How of curiosity, you may ask: Where does that “magic number” of 9474 come from?

The modulo operation comes here to the rescue! Modulo basically means dividing two integer numbers and taking the remainder as the result of the operation.

So, if you take the correct sum value of 75010 and divide it by the number of integer values that can be represented with 16 bits, which is 2^16 = 65536, and you get the remainder of that integer division, the result is 9474, which is the result returned by the above Sum function!

Now, some people like to say that in C++ there is no overflow with unsigned integers, as before the overflow happens, the modulo operation is applied with the wrap around. I think this is more like a “word war”, but the concept should be clear at this point. In any case, when the sum of two unsigned integers doesn’t fit in the given unsigned integer type, the modulo operation is applied, with a consequent wrap around of the result. The key point is that, for unsigned integers, this is well defined behavior. Anyway, this is the reason why I enclosed the word “overflow” in double quotes in the blog title, and somewhere in the blog post text as well.

Coming back to the original sum problem, independently from the mechanics of the modulo operation and wrap around of unsigned integers, the key point is that the Sum function above returned a value that is not what a user would normally expect.

So, how can you prevent that from happening?

Well, just as we saw in the previous blog post on signed integer overflow, before doing the actual partial cumulative sum, we can check that the result does not overflow. And, if it does, we can throw an exception to signal the error.

Note that, while in the case of signed integers we have to check both the positive number and negative number cases, the latter check doesn’t apply here to unsigned integers (as there are no negative unsigned integers):

#include <cstdint>    // for uint16_t
#include <limits>     // for std::numeric_limits
#include <stdexcept>  // for std::overflow_error
#include <vector>     // for std::vector

// Sum the 16-bit unsigned integers stored in the values vector.
// Throws a std::overflow_error exception on integer overflow.
uint16_t Sum(const std::vector<uint16_t>& values)
{
    uint16_t sum = 0;

    for (auto num : values)
    {
        //
        // Check for integer overflow *before* doing the sum.
        // This will prevent bogus results due to "wrap around"
        // of unsigned integers.
        //
        if (num > 0 && sum > std::numeric_limits<uint16_t>::max() - num)
        {
            throw std::overflow_error("Overflow in Sum function.");
        }

        // The sum is safe
        sum += num;
    }

    return sum;
}

If you try to invoke the above function with the initial input vector, you will see that you get an exception thrown, instead of a wrong sum returned:

std::vector<uint16_t> v{ 10, 1000, 2000, 32000, 40000 };

try
{
    std::cout << Sum(v) << '\n';
}
catch (const std::overflow_error& ex)
{
    std::cout << "Overflow exception correctly caught!\n";
    std::cout << ex.what() << '\n';
}

Next time, I’d like to introduce a library that can help writing safer integer code in C++.