VS Code with MS C/C++ Extension: A Confusing UI Design Choice

In VS Code, selecting the C++ language standard is not as intuitive as one would expect.

I have been using Visual Studio for C++ development since it was still called Visual C++ (and was a 100% C++-focused IDE), starting from version 4 (maybe 4.2) on Windows 95. I loved VC++ 6. Even today, Microsoft Visual Studio is still my first choice for C++ development on Windows.

In addition to that, I wanted to use VS Code for C++ development for some course work. Why choosing VS Code? Well, in addition to being free to use (as is the Visual Studio Community Edition), another important point of VS Code in that teaching context is its cross-platform feature: in fact, it’s available not only for Windows, but also for Linux and Mac, and students using those platforms could easily follow along.

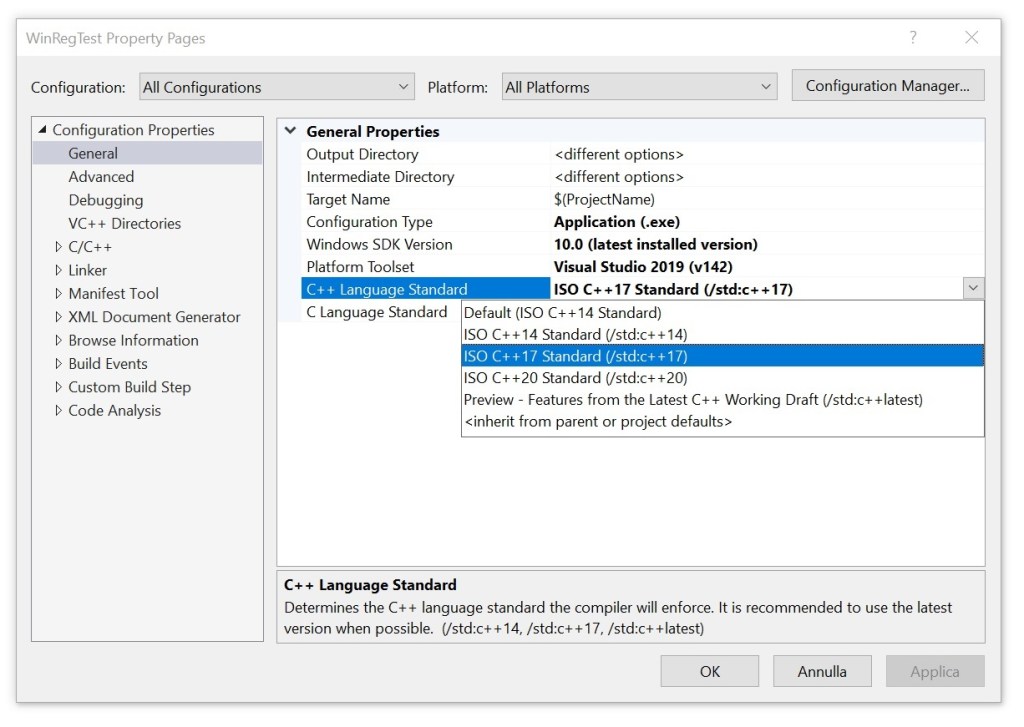
I had VS Code and the MS C/C++ extension already installed on one of my PCs. I wrote some C++ demo code that used some C++20 features. I tried to build that code, and I got some error messages, telling me that I was using features that required at least C++20. Fine, I thought: Maybe the default C++ standard is set to something pre-C++20 (for example, VS 2019 defaults to C++14).

So, I pressed Ctrl+Shift+P, selected C/C++ Edit Configurations (UI), and in the C/C++ Configurations page, selected c++20 for the C++ standard.

Then I pressed F5 to start a debugging session, preceded by a build process, and saw that the build process failed.

I took a look at the error message in the terminal window, and to my surprise the error messages were telling me that some libraries (like <span>) were available only with C++20 or later. But I had just selected the C++20 standard a few minutes ago!

So, I double-checked, pressing Ctrl+Shift+P and selecting C/C++ Edit Configurations (UI), and in the C/C++ Configurations, the selected C++ standard was c++20, as expected.

The C++20 Standard is selected in the Microsoft C/C++ Extension Configurations UI.
C++20 selected in the MS C/C++ Extension Configurations UI

I also took a look at the c_cpp_properties.json, and found that the “cppStandard” property was properly set to “c++20”, as well.

The C++20 Standard is selected in the c_cpp_properties.json file.
C++20 selected in the c_cpp_properties.json

Despite these confirmations in the UI, I noted that in the terminal window, on the command line used to build the C++ source code, the option to set the C++20 compilation mode was not passed to the C++ compiler!

The command line doesn't contain an option for the C++20 language standard previously set in the UI.
Surprisingly, the option for the C++ language standard was not passed on the command line

So, basically, the UI was telling me that the C++20 mode was enabled. But the C++ compiler was invoked in a way that did not reflect that, as the flag enabling C++20 was not specified on the command line!

I also tried to close and reopen VS Code, double-checked things one more time, but the results were always the same: C++20 was set in the C/C++ Configurations UI and in the c_cpp_properties.json file, but compilation failed due to the C++20 option not specified on the command line when invoking the C++ compiler.

I thought that this was a bug, and opened an issue on the MS C/C++ Extension GitHub page.

After some time, to my surprise, I noted that the issue was closed as “by design”! Seriously? I mean, what kind of good reasonable intuitive design is the one in which the UI tells you that you have selected a given C++ language standard, but the command line doesn’t compile your code according to that??

This is the comment associated to the closing of the issue:

This is “by design”. The settings in c_cpp_properties.json do not affect the build. You need to set the flags in your tasks.json or other source of build info (CMakeLists.txt etc.).

So, am I supposed to manually set the C++20 flag in the tasks.json, despite having already set it in the C/C++ Configurations UI? Well, I do think that is either a bug, or a bad and confusing design choice. If I set the C++20 option in the UI, that should be automatically reflected on the command line, as well. If a modification is required to tasks.json to enable C++20, that should have been the job of the UI, in which I had already selected the C++20 standard!

Compare that to the sane intuitive behavior of Visual Studio, in which you can simply set the C++ standard option in the UI, and the IDE will invoke the C++ compiler with the proper flags, reflecting that.

Selecting the C++ Language Standard in Visual Studio 2019

How To Fix an Unhandled System.DllNotFoundException in Mixed C++/C# Projects

Let’s see how to fix a common problem when building mixed C++/C# projects in Visual Studio.

Someone had a Visual Studio 2019 solution containing a C# application project and a native C++ DLL project. The C# application was supposed to call some C-interface functions exported by the native C++ DLL.

Both projects built successfully in Visual Studio. But, after the C# application was launched, a System.DllNotFoundException was thrown when the C# code tried to invoke the DLL-exported functions:

Visual Studio shows an error message complaining about an unhandled exception of type System.DllNotFoundException when trying to invoke native C++ DLL functions from C# code.
Visual Studio complains about an unhandled System.DllNotFoundException when debugging the C# application.

So, it looks like the C# application is unable to find the native C++ DLL.

First Attempt: A Manual Fix

In a first attempt to solve this problem, I tried manually copying the native C++ DLL from the folder where it was built into the same folder where the C# application was built (for example: from MySolution\Debug to MySolution\CSharpApp\bin\Debug). Then, I relaunched the C# application, and everything worked fine as expected this time! Wow 🙂 The problem was kind of easy to fix.

However, I was not 100% happy, as this was kind of a manual fix, that required manually copying-and-pasting the DLL from its own folder to the C# application folder. I would love to have Visual Studio doing that automatically!

A Better Solution: Making the Copy Automatic in Post-build

Well, it turns out that we can do better than that! In fact, it’s possible to automate that process and basically instruct Visual Studio’s build system to perform the aforementioned copy for us. To do so, we basically need to specify a custom command line that VS automatically executes as a post-build event.

In Solution Explorer, right-click on the C# application project, and select Properties from the menu.

Select the Build Events tab, and enter the desired copy instruction in the Post-build event command line box. For example, the following command can be used:

xcopy "$(SolutionDir)$(Configuration)\MyCppDll.dll" "$(TargetDir)" /Y

Then type Ctrl+S or click the Save button (= diskette icon) in the toolbar to save these changes.

Setting a post-build event command line inside Visual Studio IDE to copy the DLL into the same folder of the C# application.
Setting the post-build event command line to copy the DLL into the C# application folder

Basically, with the above settings we are telling Visual Studio: “Dear VS, after successfully building the C# application, please copy the C++ DLL from its original folder into the same folder where you have just built the C# application. Thank you very much!”

After relaunching the C# application, this time everything went well, and the C# EXE was able to find the C++ DLL and call its exported C-interface functions.

Addendum: Demystifying the $(Thingy)

If you take a look at the custom copy command added in post-build event, you’ll notice some apparently weird syntax like $(SolutionDir) or $(TargetDir). These $(something) are basically MSBuild macros, that expand to meaningful stuff like the path of the Visual Studio solution, or the directory of the primary output file for the build (e.g. the directory where the C# application .exe file is created).

You can read more about those MSBuild macros in this MSDN page: Common macros for MSBuild commands and properties.

Note that the macros representing paths can include the trailing backslash \; for example, this is the case of $(SolutionDir). So, take that into account when combining these macros to refer to actual sub-directories and paths in your solution.

Considering the command used above:

xcopy "$(SolutionDir)$(Configuration)\MyCppDll.dll" "$(TargetDir)" /Y

$(SolutionDir) represents the full path of the Visual Studio solution, e.g. C:\Users\Gio\source\repos\MySolution\.

$(TargetDir) is the directory of the primary output file for the build, for example the directory where the C# console app .exe is created. This could be something like C:\Users\Gio\source\repos\MySolution\CSharpApp\bin\Debug\.

$(Configuration) is the name of the current project configuration, for example: Debug when doing a debug build.

So, for example: $(SolutionDir)$(Configuration) would expand to something like C:\Users\Gio\source\repos\MySolution\Debug in debug builds.

In addition, you can also see how these MSBuild macros are actually expanded in a given context. To do so in Visual Studio, once you are in the Build Events tab, click the Edit Post-build button. Then click the Macros > > button to view the actual expansions of those macros.

A sample expansion of some MSBuild macros.
Sample expansion of some MSBuild macros

C++ Myth-Buster: UTF-8 Is a Simple Drop-in Replacement for ASCII char-based Strings in Existing Code

Let’s bust a myth that is a source of many subtle bugs. Are you sure that you can simply drop UTF-8-encoded text in char-based strings that expect ASCII text, and your C++ code will still work fine?

Several (many?) C++ programmers think that we should use UTF-8 everywhere as the Unicode encoding in our C++ code, stating that UTF-8 is a simple easy drop-in replacement for existing code that uses ASCII char-based strings, like const char* or std::string variables and parameters.

Of course, that UTF-8-simple-drop-in-replacement-for-ASCII thing is wrong and just a myth!

In fact, suppose that you wrote a C++ function whose purpose is to convert a std::string to lower case. For example:

// Code proposed by CppReference:
// https://en.cppreference.com/w/cpp/string/byte/tolower
//
// This code is basically the same found on StackOverflow here:
// https://stackoverflow.com/q/313970
// https://stackoverflow.com/a/313990 (<-- most voted answer)

std::string str_tolower(std::string s)
{
    std::transform(s.begin(), s.end(), s.begin(),
        // wrong code ...
        // <omitted>
 
        [](unsigned char c){ return std::tolower(c); } // correct
    );
    return s;
}

Well, that function works correctly for pure ASCII characters. But as soon as you try to pass it a UTF-8-encoded string, that code will not work correctly anymore! That was already discussed in my previous blog post, and also in this post on The Old New Thing blog.

I’ll give you another simple example. Consider the following C++ function, PrintUnderlined(), that receives a std::string (passed by const&) as input, and prints it with an underline below:

// Print the input text string, with an underline below
void PrintUnderlined(const std::string& text)
{
    std::cout << text << '\n';
    std::cout << std::string(text.length(), '-') << '\n';
}

For example, invoking PrintUnderlined(“Hello C++ World!”), you’ll get the following output:

Hello C++ World!
----------------

Well, as you can see, this function works fine with ASCII text. But, what happens if you pass UTF-8-encoded text to it?

Well, it may work as expected in some cases, but not in others. For example, what happens if the input string contains non-pure-ASCII characters, like the LATIN SMALL LETTER E WITH GRAVE è (U+00E8)? Well, in this case the UTF-8 encoding for “è” is represented by two bytes: 0xC3 0xA8. So, from the viewpoint of the std::string::length() method, that “single character è” counts as two chars. So, you’ll get two underscore characters for the single è, instead of the expected one underscore character. And that will produce a bogus output with the PrintUnderlined function! And note that this same function works correctly for ASCII char-based strings.

So, if you have some existing C++ code that works with const char* or std::string, or similar char-based string types, and assumes ASCII encoding for text, don’t expect to pass a UTF-8-encoded strings and have it just automagically working fine! The existing code may still compile fine, but there is a good chance that you could have introduced subtle runtime bugs and logic errors!

Some kanji characters

Spend some time thinking about the exact type of encoding of the const char* and std::string variables and parameters in your C++ code base: Are they pure ASCII strings? Are these char-based strings encoded in some particular ANSI/Windows code pages? Which code page? Maybe it’s an “ANSI” Windows code page like Latin 1 / Western European Windows-1252 code page? Or some other code page?

You can pack many different kinds of stuff in char-based strings (ASCII text, text encoded in various code pages, etc.), and there is no guarantee that code that used to work fine with that particular encoding would automatically continue to work correctly when you pass UTF-8-encoded text.

If we could start everything from scratch today, using UTF-8 for everything would certainly be an option. But, there is a thing called legacy code. And you cannot simply assume that you can just drop UTF-8-encoded strings in the existing char-based strings in existing legacy C++ code bases, and that everything will magically work fine. It may compile fine, but running fine as expected is another completely different thing.

How to Safely Pass a C++ String View as Input to a C-interface API

Use STL string objects like std::string/std::wstring as a safe bridge.

Last time, we saw that passing a C++ std::[w]string_view to a C-interface API (like Win32 APIs) expecting a C-style null-terminated string pointer can cause subtle bugs, as there is a requirement impedance mismatch. In fact:

  • The C-interface API (e.g. Win32 SetWindowText) expects a null-terminated string pointer
  • The STL string views do not guarantee null-termination

So, supposing that you have a C++17 (or newer) code base that heavily uses string views, when you need to interface those with Win32 API function calls, or whatever C-interface API, expecting C-style null-terminated strings, how can you safely pass instances of string views as input parameter?

Invoking the string_view/wstring_view’s data method would be dangerous and source of subtle bugs, as the data returned pointer is not guaranteed to point to a null-terminated string.

Instead, you can use a std::string/wstring object as a bridge between the string views and the C-interface API. In fact, the std::string/wstring’s c_str method does guarantee that the returned pointer points to a null-terminated string. So it’s safe to pass the pointer returned by std::[w]string::c_str to a C-interface API function that expects a null-terminated C-style string pointer (like PCWSTR/LPCWSTR parameters in the Win32 realm).

For example:

// sv is a std::wstring_view

// C++ STL strings can be easily initialized from string views
std::wstring str{ sv };

// Pass the intermediate wstring object to a Win32 API,
// or whatever C-interface API expecting 
// a C-style *null-terminated* string pointer.
DoSomething( 
    // PCWSTR/LPCWSTR/const wchar_t* parameter
    str.c_str(), // wstring::c_str

    // Other parameters ...    
);

// Or use a temporary string object to wrap the string view 
// at the call site:
DoSomething(
    // PCWSTR/LPCWSTR/const wchar_t* parameter
    std::wstring{ sv }.c_str(),

    // Other parameters ...
);

How To Convert Unicode Strings to Lower Case and Upper Case in C++

How to *properly* convert Unicode strings to lower and upper cases in C++? Unfortunately, the simple common char-by-char conversion loop with tolower/toupper calls is wrong. Let’s see how to fix that!

Back in November 2017, on my previous MS MVPs blog, I wrote a post criticizing what was a common but wrong way of converting Unicode strings to lower and upper cases.

Basically, it seems that people started with code available on StackOverflow or CppReference, and wrote some kind of conversion code like this, invoking std::tolower for each char/wchar_t in the input string:

// BEWARE: *** WRONG CODE AHEAD ***

// From StackOverflow - Most voted answer (!)
// https://stackoverflow.com/a/313990

#include <algorithm>
#include <cctype>
#include <string>

std::string data = "Abc";
std::transform(data.begin(), data.end(), data.begin(),
    [](unsigned char c){ return std::tolower(c); });

// BEWARE: *** WRONG CODE AHEAD ***

// From CppReference:
// https://en.cppreference.com/w/cpp/string/byte/tolower
std::string str_tolower(std::string s)
{
    std::transform(s.begin(), s.end(), s.begin(),
        // wrong code ...
        // <omitted>

        [](unsigned char c){ return std::tolower(c); } // correct
    );
    return s;
}

That kind of code would be safe and correct for pure ASCII strings. But even if you consider Unicode UTF-8-encoded strings, that code would be totally wrong.

Very recently (October 7th, 2024), a blog post appeared on The Old New Thing blog, discussing how that kind of conversion code is wrong:

std::wstring name;

std::transform(name.begin(), name.end(), name.begin(),
    [](auto c) { return std::tolower(c); });

Besides the copy-and-pasto of using std::tolower instead of std::towlower for wchar_ts, there are deeper problems in that kind of approach. In particular:

  • You cannot convert in a context-free manner like that wchar_t-by-wchar_t, as context involving adjacent wchar_ts can indeed be important for the conversion.
  • You cannot assume that the result string has the same size (“length” in wchar_ts) as the input source strings, as that is in general not true: In fact, there are cases where to-lower/to-upper strings can be of different lengths than the original strings.

As I wrote in my old 2017 article (and stated also in the recent Old New Thing blog post), a possible solution to properly convert Unicode strings to lower and upper cases in Windows C++ code is to use the LCMapStringEx Windows API. This is a low-level C interface API.

I wrapped it in higher-level convenient reusable C++ code, available here on GitHub. I organized that code as a header-only library: you can simply include the library header, and invoke the ToStringLower and ToStringUpper helper functions. For example:

#include "StringCaseConv.hpp"  // the library header


std::wstring name;

// Simply convert to lower case:
std::wstring lowerCaseName = ToStringLower(name);

The ToStringLower and ToStringUpper functions take std::wstring_view as input parameters, representing views to the source strings. Both functions return std::wstring instances on success. On error, C++ exceptions are thrown.

There are also overloaded forms of these functions that accept a locale name for the conversion.

The code compiles cleanly with VS 2019 in C++17 mode with warning level 4 (/W4) in both 64-bit and 32-bit builds.

Note that the std::wstring and std::wstring_view instances represent Unicode UTF-16 strings. If you need strings represented in another encoding, like UTF-8, you can use conversion helpers to convert between UTF-16 and UTF-8.

P.S. If you need a portable solution, as already written in my 2017 article, an option would be using the ICU library with its icu::UnicodeString class and its toLower and toUpper methods.

Why Don’t You Use String Views (as std::wstring_view) Instead of Passing std::wstring by const&?

Thank you for the suggestion. But *in that context* that would cause nasty bugs in my code, and in code that relies on it.

…Because (in the given context) that would be wrong 🙂

This “suggestion” comes up with some frequency…

The context is this: I have some Win32 C++ code that takes input string parameters as const std::wstring&, and someone suggests me to substitute those wstring const reference parameters with string views like std::wstring_view. This is usually because they have learned from someone in some course/video course/YouTube video/whatever that in “modern” C++ code you should use string views instead of passing string objects via const&. [Sarcastic mode on]Are you passing a string via const&? Your code is not modern C++! You are such an ignorant C++98 old-style C++ programmer![Sarcastic mode off] 😉

(There are also other “gurus” who say that in modern C++ you should always use exceptions to communicate error conditions. Yeah… Well, that’s a story for another time…)

So, Thank you for the suggestion, but using std::wstring_view instead of const std::wstring& in that context would introduce nasty bugs in my C++ code (and in other people’s code that relies on my own code)! So, I won’t do that!

In fact, my C++ code in question (like WinReg) talks to some Win32 C-style APIs. These expect PCWSTR as input parameters representing Unicode UTF-16 strings. A PCWSTR is basically a typedef for a _Null_terminated_ const wchar_t*. The key here is the null termination part.

If you have:

// Input string passed via const&.
//
// Someone suggests me to replace 'const wstring &' 
// with wstring_view:
//
//     void DoSomething(std::wstring_view s, ...)
//
void DoSomething(const std::wstring& s, ...)
{
    // This API expects input string as PCWSTR,
    // i.e. _null-terminated_ const wchar_t*.
    SomeWin32Api(s.data(), ...); // <-- See the P.S. later
}

std::wstring guarantees that the pointer returned by the wstring::data() method points to a null-terminated string.

On the other hand, invoking std::wstring_view::data() does not guarantee that the returned pointer points to a null-terminated string. It may, or may not. But there is no guarantee!

So, since [w]string_views are not guaranteed to be null-terminated, using them with Win32 APIs that expect null-terminated strings is totally wrong and a source of nasty bugs.

So, if your target are Win32 API calls that expect null-terminated C-style strings, just keep passing good old std::wstring by const&.

Bonus Reading: The Case of string_view and the Magic String


P.S. Invoking data() vs. c_str() – To make things clearer (and more bug-resistant), when you need a null-terminated C-style string pointer as input parameter, it’s better to invoke the c_str() method on [w]string (instead of the data() method), as there is no corresponding c_str() method available with [w]string_view.

In this way, if someone wants to “modernize” the existing C++ code and tries to change the input string parameter from [w]string const& to [w]string_view, they get a compiler error when the c_str() method is invoked in the modified code (as there is no c_str() method available for string views). It’s much better to get a compile-time error than a subtle run-time bug!

On the other hand, the data() method is available for both strings and string views, but its guarantees about null-termination are different for strings vs. string views.

So, invoking the string’s c_str() method (instead of the data() method) is what I suggest when passing STL strings to Win32 API calls that expect C-style null-terminated string pointers as input (read-only) parameters. I consider this a best practice.

(Of course, if the C-interface API function needs to write to the provided string buffer, the data() method must be invoked, as it’s overloaded for both the const and non-const cases.)

How to Access std::vector’s Internal Array

Pay attention to the target of the address-of (&) operator!

Suppose that you have some data stored in a std::vector, and you need to pass it to a function that takes a pointer to the beginning of the data, and in addition the data size or element count.

Something like this:

// Input data to process
std::vector<int> myData = { 11, 22, 33 };

//
// Do some processing on the above data
//
DoSomething(
    ??? ,         // beginning of data 
    myData.size() // element count
);

You may think of using the address-of operator (&) to get a pointer to the beginning of the data, like this:

// Note: *** Wrong code ***
DoSomething(&myData, myData.size());

But the above code is wrong. In fact, if you use the address-of operator (&) with a std::vector instance, you get the address of the “control block” of std::vector, that is the block that contains the three pointers first, last, end, according to the model discussed in a previous blog post:

Taking the address of a std::vector returns a pointer to the beginning of its control block
Taking the address of a std::vector (&v) points to its control block

Luckily, if you try the above code, it will fail to compile, with a compiler error message like this one produced by the Visual C++ compiler in VS 2019:

Error C2664: 'void DoSomething(const int *,size_t)': 
cannot convert argument 1 
from 'std::vector<int,std::allocator<int>> *' to 'const int *'
Types pointed to are unrelated; conversion requires reinterpret_cast, C-style cast or function-style cast

What you really want here is the address of the vector’s elements stored in contiguous memory locations, and pointed to by the vector’s control block.

To get that address, you can invoke the address-of operator on the first element of the vector (which is the element at index 0): &v[0].

// This code works
DoSomething(&myData[0], myData.size());

As an alternative, you can invoke the std::vector::data method:

DoSomething(myData.data(), myData.size());

Now, there’s a note I’d like to point out for the case of empty vectors:

According to the documentation on CppReference:

If size() is ​0​, data() may or may not return a null pointer.

CppReference.com

I would have preferred a well-defined behavior such that, when size is 0 (i.e. the vector is empty), data() must return a null pointer (nullptr). This is the good behavior that is implemented in the C++ Standard Library that comes with VS 2019. I believe the C++ Standard should be fixed to adhere to this intelligent behavior.

Subtle C++ Compiler Error with std::optional and the Conditional Operator

An example of writing clear code with good intention, but getting an unexpected C++ compiler error.

Someone asked me for help with their C++ code. The code was something like this:

std::wstring something;
std::optional<bool> result = something.empty() ?
        ReadBoolValueFromRegistry() : {};

The programmer who wrote this code wanted to check whether the ‘something’ string was empty, and if it was, a boolean value had to be read from the Windows registry, and then stored into the std::optional result variable.

On the other hand, if the ‘something’ string was not empty, the std::optional result should be default-initialized to an empty optional (i.e. an optional that doesn’t contain any value).

That was the programmer’s intention. Unfortunately, their code failed to compile with Visual Studio 2019 (C++17 mode was enabled).

Partial screenshot of the C++ code that doesn't compile, showing squiggles under the opening brace.
The offending C++ code with squiggles under the {

There were squiggles under the opening brace {, and the Visual C++ compiler emitted the following error messages:

Error CodeDescription
C2059syntax error: ‘{‘
C2143syntax error: missing ‘;’ before ‘{‘

I was asked: “What’s the problem here? Are there limitations of using the {} syntax to specify nothing?”

This is a good question. So, clearly, the C++ compiler didn’t interpret the {} syntax as a way to default-initialize the std::optional in case the string was not empty (i.e. the second “branch” in the conditional ternary operator).

A first step to help the C++ compiler figuring out the programmer’s intention could be to be more explicit. So, instead of using {}, you can try and use the std::nullopt constant, which represents an optional that doesn’t store any value.

// Attempt to fix the code: replace {} with std::nullopt
std::optional<bool> result = something.empty() ?
        ReadBoolValueFromRegistry() : std::nullopt;

Unfortunately, this code doesn’t compile either.

Why is that?

Well, to figure that out, let’s take a look at the C++ conditional operator (?:). Consider the conditional operator in its generic form:

// C++ conditional operator ?:
exp1 ? exp2 : exp3

In the above code snippet, “exp2” is represented by the ReadBoolValueFromRegistry call. This function returns a bool. So, in this case the return type of the conditional operator is bool.

// Attempt to fix the code: replace {} with std::nullopt
std::optional<bool> result = something.empty() ?
        ReadBoolValueFromRegistry() : std::nullopt;
//             ^^^--- exp2             ^^^--- exp3
//             Type: bool

On the other hand, if you look at “exp3”, you see std::nullopt, which is a constant of type std::nullopt_t, not a simple bool value!

So, you have this kind of type mismatch, and the C++ compiler complains. This time, the error message is:

Error C2446 ‘:’: no conversion from ‘const std::nullopt_t’ to ‘bool’

So, to fix that code, I suggested to “massage” it a little bit, like this:

// Rewrite the following code:
//
// std::optional<bool> result = something.empty() ? 
//        ReadBoolValueFromRegistry() : {};
//
// in a slightly different manner, like this:
//
std::optional<bool> result{};
if (something.empty()) {
    result = ReadBoolValueFromRegistry();
}

Basically, you start with a default-initialized std::optional, which doesn’t contain any value. And then you assign the bool value read from the registry only if the particular condition is met.

The above C++ code compiles successfully, and does what was initially in the mind of the programmer.

P.S. I’m not a C++ “language lawyer”, but it would be great if the C++ language could be extended to allow the original simple code to just work:

std::optional<bool> result = something.empty() ?
        ReadBoolValueFromRegistry() : {};

How to Get the “Size” of a std::vector?

First, let’s reveal the mystery of the “fixed 24-byte sizeof”; then, let’s see how to properly get the total size, in bytes, of all the elements stored in a std::vector.

Someone was modernizing some legacy C++ code. They had an array defined like this:

int v[100];

and they needed the size, in bytes, of that array, to pass that value to some function. They used sizeof(v) to get the previous array size.

When modernizing their code, they chose to use std::vector instead of the above raw C-style array. And they still used sizeof(v) to retrieve the size of the vector. For example:

// Create a vector storing 100 integers
std::vector<int> v(100);

std::cout << sizeof(v);

The output they got when building their code in release mode with Visual Studio 2019 was 24. They also noted that they always got the same 24 output, independently from the number of elements in the std::vector!

This is clearly a bug. Let’s try to shed some light on it and show the proper way of getting the size of the total number of elements stored in a std::vector.

First, to understand this bug, you need to know how a std::vector is implemented. Basically, at least in Microsoft STL implementation (in release builds, and when using the default allocator1), a std::vector is made by three pointers, kind of like this:

template <typename T>
class vector
{
    T* first;
    T* last;
    T* end;

    ...
};
Diagram showing a typical implementation of std::vector, made by three pointers: first, last and end. The valid elements are those pointed between first (inclusive) and last (exclusive).
Typical implementation of std::vector with three pointers: first, last, end
  1. first: points to the beginning of the contiguous memory block that stores the vector’s elements
  2. last: points one past the last valid element stored in the vector
  3. end: points one past the end of the allocated memory for the vector’s elements

Spelunking inside the Microsoft STL implementation, you’ll see that the “real” names for these pointers are _Myfirst, _Mylast, _Myend, as shown for example in this part of the <vector> header:

Part of the vector header that shows the identifiers that represent the vector's three internal pointers: first, last and end.
An excerpt of the <vector> header that comes with Microsoft Visual Studio 2019

So, when you use sizeof with a std::vector instance, you are actually getting the size of the internal representation of the vector. In this case, you have three pointers. In 64-bit builds, each pointer occupies 8 bytes, so you have a total of 3*8 = 24 bytes, which is the number that sizeof returned in the above example.

As you can see, this number is independent from the actual number of elements stored in the vector. Whether the vector has one, three, ten or 10,000 elements, the size of the vector’s internal representation made by those three pointers is always fixed and given by the above number (at least in the Microsoft’s STL implementation that comes with Visual Studio2).

Now that the bug has been analyzed and the mystery explained, let’s see how to fix it.

Well, to get the “size of a vector”, considered as the number of bytes occupied by the elements stored in the vector, you can get the number of elements stored in the vector (returned by the vector::size method), and multiply that by the (fixed) size of each element, e.g.:

//
// v is a std::vector<int>
//
// v.size()    : number of elements in the vector
// sizeof(int) : size, in bytes, of each element
//
size_t sizeOfAllVectorElementsInBytes = v.size() * sizeof(int);

To write more generic code, assuming the vector is not empty, you can replace sizeof(int) with sizeof(v[0]), which is the sizeof the first element stored in the vector. (If the vector is empty, there is no valid element stored in it, so the index zero in v[0] is out of bounds, and the above code won’t work; it will probably trigger an assertion failure in debug builds.)

In addition, you could use the vector::value_type type name member to get the size of a single element (which would work also in the case of empty vectors). For example:

using IntVector = std::vector<int>;

IntVector v(100);

// Print the number of bytes occupied 
// by the (valid) elements stored in the vector:
cout << v.size() * sizeof(IntVector::value_type);

To be even more generic, a helper template function like this could be used:

//
// Return the size, in bytes, of all the valid elements
// stored in the input vector
//
template <typename T, typename Alloc>
inline size_t SizeOfVector(const std::vector<T, Alloc> & v)
{
    return v.size() * sizeof(std::vector<T, Alloc>::value_type);
}


//
// Sample usage:
//
std::vector<int> v(100);
std::cout << SizeOfVector(v) << '\n'; 
// Prints 400, i.e. 100 * sizeof(int)

Bonus Reading

If you want to learn more about the internal implementation of std::vector (including how they represent the default allocator with an “empty class” using the compressed pair trick), you can read these two interesting blog posts on The Old New Thing blog:

  1. Inside the STL: The pair and the compressed pair
  2. Inside the STL: The vector

  1. In debug builds, or when using a custom allocator, there can be more stuff added to the above simple std::vector representation. ↩︎
  2. Of course, that number can change in debug builds, or when using custom allocators, as per the previous note. ↩︎

C++ Mystery Revealed: Why Do I Get a Negative Integer When Adding Two Positive Integers?

Explaining some of the “magic” behind signed integer overflow weird results.

In this blog post, I showed you some “interesting” (apparently weird) results that you can get when adding signed integer numbers. In that example, you saw that, if you add two positive signed integer numbers and their sum overflows (signed integer overflow is undefined behavior in C++), you can get a negative number.

As another example, I compiled this simple C++ code with Visual Studio C++ compiler:

#include <cstdint>  // for int16_t
#include <iostream> // for std::cout

int main()
{
    using std::cout;

    int16_t a = 3000;
    int16_t b = 32000;
    int16_t c = a + b;  // -30536

    cout << " a = " << a << '\n';
    cout << " b = " << b << '\n';
    cout << " a + b = " << c << '\n';
}

and got this output, with a negative sum of -30536.

Two positive integers are added, and a negative sum is returned due to signed integer overflow.
Signed integer overflow causing a negative sum when adding positive integers

Now, you may ask: Why is that?

Well, to try to answer this question, consider the binary representations of the integer numbers from the above code:

int16_t a = 3000;  // 0000 1011 1011 1000
int16_t b = 32000; // 0111 1101 0000 0000
int16_t c = a + b; // 1000 1000 1011 1000

If you add a and b bitwise, you’ll get the binary sequence shown above for c.

Now, if you interpret the c sum’s binary sequence as a signed integer number in the Two’s complement representation, you’ll immediately see that you have a negative number! In fact, the most significant bit is set to 1, which in Two’s complement representation means that the number is negative.

int16_t c = a + b; 
    //  c: 1000 1000 1011 1000
    //     1xxx xxxx xxxx xxxx
    //     *
    //     ^--- Negative number
    //          Most significant bit = 1

In particular, if you interpret the sum’s binary sequence 1000 1000 1011 1000 in Two’s complement, you’ll get exactly the negative value of -30536 shown in the above screenshot.